Tuesday, December 18, 2012

Polar Express Party

12182012 03712182012 03612182012 03512182012 03412182012 032.112182012 029
12182012 027.212182012 027.1.112182012 01412182012 00712182012 00612182012 005
12182012 00412182012 003Polar Express

First, let me start off by apologizing for lack of posts. I have been super busy and I just haven't had the chance to devote as much time as I would like to this blog. That will probably be one of my New Year's Resolutions for 2013.

Now, on to the party! Today the kids had their Christmas party at school. It was a Polar Express Themed party. All the kids arrived in their pajamas, watched the movie and then we also served them hot chocolate! It was a fun party!!

Wednesday, October 31, 2012

Monster Bash

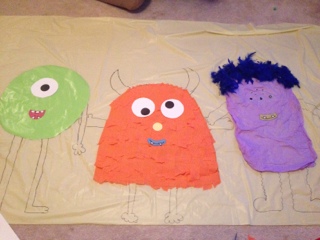
Yesterday was the twins' Halloween Party at school.  This was soooo much fun!!  I created this party for less than $5.  I used everything I had around the house and I bought 2 table cloths from the dollar store to be a table cloth and the background.  All I did was free hand draw some monsters, glued different material on the table cloth (wrapping paper, crepe streamers, and tissue paper.)  I used feather boas for hair on one monster (bought at the Dollar Tree) and then glued silly eyes.  Easy and cute, my kind of party!


Monday, October 22, 2012

Birthday Banner

Last week I had a client who asked that I make a birthday banner for her son's birthday!  It was a Mickey party and you know how much we love Mickey at our house!


Sneak Peek

SO...I have been asked to be room mom again this year. However, our teacher this year is so much more easy going and loves parties. Next week we are having their class Halloween party and I just couldn't wait to show you a sneak peek! What do you think?

I've got a lot to work on, but it is coming along!

Sunday, October 21, 2012

Halloween Wreath

It is that special time again, Halloween! One of my favorite holidays!!! I wanted share a new trend that is super easy to DIY, mesh wreaths. It is simple as 1, 2, 3. First materials are mesh fabric, pipe cleaners, wire wreath, and fillers.

1. Place pipe cleaners around wreath.
2. Gather your fabric and twist tie with the pipe cleaners.
3. Fill in with fabric and decor!

Wednesday, October 3, 2012

Witch wreath

When I was looking for inspiration for my Halloween wreath this year, I turned to my favorite site, Pinterest! Saw some cute mesh fabric wreaths and I thought "I'm going to try and do one of those". So I set out to my favorite cost savvy store, The Dollar Tree. I found some great things! I found a witch hat, black roses and spiders, as well as a cute green sign. So...here is my before and after photos. Let me know what you think. (By the way, the legs came from Hobby Lobby.)

It's October

Halloween is one of my most favorite holidays! I rank it very close to Christmas. It's not about the candy, it's the fact that we can dress up and decorate to our heart's desire! So I plan trying to write a lot of "Halloween" posts this month. My original goal was to do 31 days of posts, but I've already failed at that one. So I'm going to go with ABC Family's theme 13 days of Halloween. There are a couple of parties coming up on the horizon and I hope to be able to share!

Thursday, August 16, 2012

Breaking out the Sewing Machine

My niece is a HUGE Dora the Explorer fan.  In fact her birthday party is Saturday and her theme party is...you guessed it, Dora.  So for her birthday present I have decided to make her something.  Dora, for those that don't know her, carries a back pack that talks and sings which always stores whatever she might need to help her in her adventure.  In the back pack is also a map.  Just like the back pack it too has a face and sings.  So for her gift I made a Dora Back Pack with a Map.  I went to the fabric store and bought about 1.5 yards of purple fabric.  I also bought felt sheets in black, red, yellow, blue, and white.  I actually bought 3 in white b/c I the only white our store had was glittered on one side and I didn't want glitter so I was going to have to sew 2 of the glitter sides together.
My picture makes this fabric look blue, but I promise it is a dark purple
It took me a day, but here are my step by step pics.


Here is the finished product:


That is a real map.  I used a transfer sheet.  However, I had the iron too hot and it melted a little, but I'm hoping Callie won't mind and instead think it looks like the map is old.

I can't wait to see her face when she gets this!!!
Wednesday, August 8, 2012

Party Crafts

Today's topic: Crafts at your Party

At most of my kids birthday parties I try to have a craft for the kids.  A good craft can also double as a favor.  It is always best to have the craft age appropriate.  Have everything ready for easy assembly.  For the Mickey & Minnie party this past weekend I had a table set up to make your own Mickey or Minnie ears.  I had headbands, ears, and bows ready and all the kids had to do was assemble.  My ears were two pieces of scrapbook paper sewed together with a small opening for the headband. 

Next is my craft that I had for Sesame Street party, which was "Make your own Elmo puppet". 

Have you had some fun crafts for your party?

Tuesday, August 7, 2012

Plates

Today's topic is plates.  I am one that likes to save money anywhere I can.  I would rather put in a little extra time than  money.  You could go out and buy a themed pack of plates for $3-$5 but would only get anywhere from 8-10 plates.  However, if you get plain colored plates you can get 20 for less than $1.  My project today is my Mickey and Minnie Plates.  I started out with just my plane basic black plate.  I cut out several circles and for Minnie I cut out several hair bows. 
All you need is glue or glue dots (my preference) and poof you have instant hit.